How to make a toy car? Get ready to rev your engines! This is your guide to making toy cars using everyday materials. Toy cars are a classic playtime favorite, and the best part is you can create them yourself! So grab your supplies and let’s get building.
There are many ways to make toy cars, and the level of difficulty can vary depending on the materials you choose. This article offers several options to suit all skill levels and interests.
Important Note: Adult supervision is recommended for younger crafters, especially when using tools like scissors or hot glue.
Cardboard Classics
Cardboard is a versatile and inexpensive material that’s perfect for crafting toy cars. Here’s what you’ll need:
- Cardboard boxes or scraps
- Scissors or craft knife (adult use only)
- Ruler
- Markers, crayons, or paint
- Colored paper (optional)
- Wheels (bottle caps, lids, or purchased toy car wheels)
- Glue (stick glue or hot glue – adult use only)
Let’s build!
-
Draw the outline of your car on a piece of cardboard. You can design your own unique car or find templates online.
-
Cut out the car shape carefully. An adult can help with cutting if needed.
-
Decorate your car! Use markers, crayons, or paint to add details like windows, doors, and headlights. You can also cut out shapes from colored paper and glue them on for extra flair.
-
Attach the wheels! Poke small holes in the cardboard where you want the wheels to go. Then, push the axles (pipe cleaners or toothpicks) through the holes and secure the wheels in place with glue.
Bonus Tip: If you want your car to roll, make sure the wheels spin freely.
Recycled Racers
Look around your house for recyclables that can be transformed into toy cars! Here are some ideas:
Plastic bottles:
Use plastic bottles, bottle caps, and straws to create a colorful car. Cut the bottle in half and decorate it. Bottle caps can be used as wheels, and straws can be cut to form axles.
Tin cans:
Tin cans can be transformed into sturdy toy cars. Decorate the can with paint or markers and add wheels made from bottle caps or cardboard circles.
Milk cartons:
Milk cartons are another great option. Cut and fold the carton to create the car body. Decorate it and add wheels made from bottle caps or other materials.
Let your imagination run wild! There are endless possibilities for creating toy cars from recycled materials.
Spoons on the Go!
Here’s a quick and easy car project that uses plastic spoons!
- Plastic spoons
- Markers
- Pipe cleaners
- Scissors (adult use only)
-
Color the spoons with markers to create your car design.
-
Cut a pipe cleaner in half. These will be the axles for your car.
-
Poke holes in the center of each spoon handle, then push the pipe cleaner pieces through the holes.
-
Bend the ends of the pipe cleaner to secure the spoons in place.
Congratulations! You’ve just made a spoon car!
Wooden Wonders
For a more advanced project, try building a car out of wood! This is a great option for older crafters or with adult supervision.
- Small wooden blocks or craft wood pieces
- Saw (adult use only)
- Sandpaper
- Hammer and nails (adult use only)
- Drill (adult use only)
- Paint or markers
- Wheels (purchased toy car wheels or wooden wheels)
Wooden car building can involve several steps. Research online tutorials for specific instructions on how to design and construct your wooden car.
These are just a few ideas to get you started on your toy car crafting adventure! With a little creativity and these handy tips, you can build a fleet of fantastic toy cars.
Toy cars are a fun and creative way to spend playtime. The best part is that you can make them yourself using everyday materials! So grab your supplies, unleash your imagination, and get ready to race!
Fantastic Foam Fun
Foam craft sheets are another excellent option for building toy cars! They come in various colors and thicknesses, offering versatility for your design. Here’s what you’ll need:
- Foam craft sheets (thick or thin depending on desired car body sturdiness)
- Scissors
- Ruler (optional)
- Markers or pens
- Stickers (optional)
- Craft glue (adult use only for younger crafters)
- Paper plates or cardboard circles (wheels)
- Pipe cleaners or straws (axles)
Let’s build!
-
Design your car! Sketch a car on paper or use a template you find online. Foam sheets are easy to cut, so you can create a car with curves or straighter edges.
-
Cut out the car body and any other pieces. Use scissors to carefully cut out the main car body shape and any separate pieces you designed, like fenders or a spoiler.
-
Decorate your ride! Foam sheets are often brightly colored, but you can still add details with markers, pens, or stickers.
-
Assembly time! If your car design has separate pieces, carefully glue them together with adult supervision if using craft glue.
-
Axle away! Just like with the cardboard car, poke holes in the bottom of your car where you want the wheels to go. Push pipe cleaners or straws through the holes and secure them to the paper plate wheels with tape or by wrapping them around the wheel a few times.
Foam car creations are another way to explore building toy cars using safe and easy-to-cut materials. Let your imagination run wild and have fun crafting!
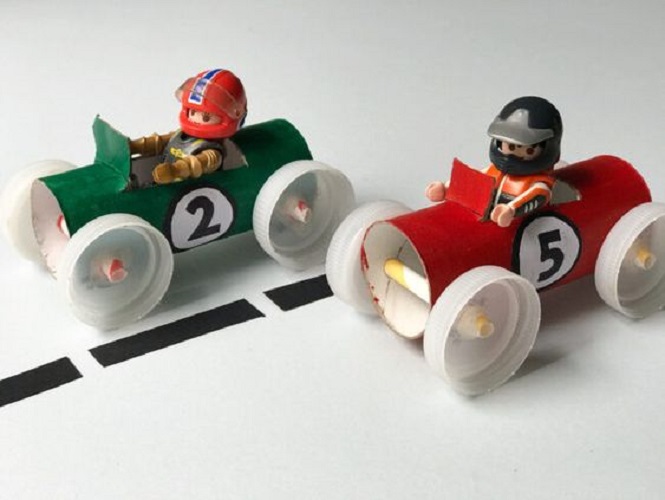
Whizzing Soda Top Racers
Let’s build!
-
Design your car body! Grab some paper or cardstock to sketch out your car body design. You can use a rectangular piece of cardboard or craft foam for a simple car base.
-
Cut out the car body. Carefully cut out the car body shape from your cardboard or craft foam.
-
Decorate your ride! This is where you can unleash your creativity. Use markers, pens, or stickers to add details like windows, doors, or driver.
-
Attach the wheels! Poke a small hole in the center of each soda bottle cap. Then, cut a pipe cleaner or straw into small pieces (each a little longer than the width of your car body). Push the pipe cleaner pieces through the holes in the bottle caps.
-
Axle assembly! Thread the pipe cleaner pieces through the cardboard or craft foam car body, spacing them out for wheel placement. Secure the pipe cleaners on the other side of the car body by wrapping them around a few times or using tape to hold them in place. Carefully push the soda bottle caps onto the pipe cleaner ends to create the wheels.